If you always wanted to contribute to Apache Kafka, but, didn’t know where to begin, then, you have come to the right place.
In this two-part series, I will guide you through this process (based on my learnings in the process of contributing to Apache Kafka).
Part 1 (current post) - Install tools needed to run Kafka from source code.
Part 2 (upcoming blog post) - Identify starter (i.e. beginner) bugs in Kafka, fix locally & test. Also, we will look at Kafka code review & code submission process.
So, lets begin with our journey.
In this post, we will be executing following steps -
- setup necessary software/tools
- download apache kafka source code
- run/debug Apache Kafka from source
For this setup, I am assuming that you are using Ubuntu 16.04 or higher.
1. Install necessary software
Java 8
Execute following commands in terminal.
> sudo add-apt-repository ppa:webupd8team/java
> sudo apt-get update
> sudo apt-get install oracle-java8-installer
> java -version
Gradle
Execute following commands in terminal to install Gradle using SDK Man:
> curl -s "https://get.sdkman.io" | bash
> sdk install gradle
> gradle -version
Git
Execute following commands in terminal:
> sudo add-apt-repository ppa:git-core/ppa
> sudo apt-get update
> sudo apt-get install git
> git --version
IntelliJ IDEA (Community edition)
Refer to IntelliJ IDEA for Ubuntu 16.04 for detailed installation steps.
> sudo snap install intellij-idea-community --classic --edge
> intellij-idea-community
Also make sure you have installed following Intellij plugins - Scala, Gradle, JUnit
2. Download Kafka source code
- Create a new github account, if you don’t have one already
- Fork Apache Kafka github project
- Using git, clone your forked project in your local m/c
> git clone https://github.com/<your github id>/kafka.git3. Build Kafka source code
Execute following commands in terminal:
> cd kafka
> gradle
> ./gradlew jar
4. Import Kafka projects into Intellij IDEA
- Start IntelliJ IDEA using -
> intellij-idea-community - Click on Import Project and browse to Kafka source folder
- Make sure you import by selecting - Import using external model > Gradle. Wait for import to complete.
- Now, build project and verify that build is successful (warnings can be ignored)
5. Run Zookeeper
Since Kafka depends on Zookeeper, we need to run it first. In a new terminal, execute following commands:
> cd kafka
> bin/zookeeper-server-start.sh config/zookeeper.properties
6. Debug/Run Kafka in IntelliJ IDEA
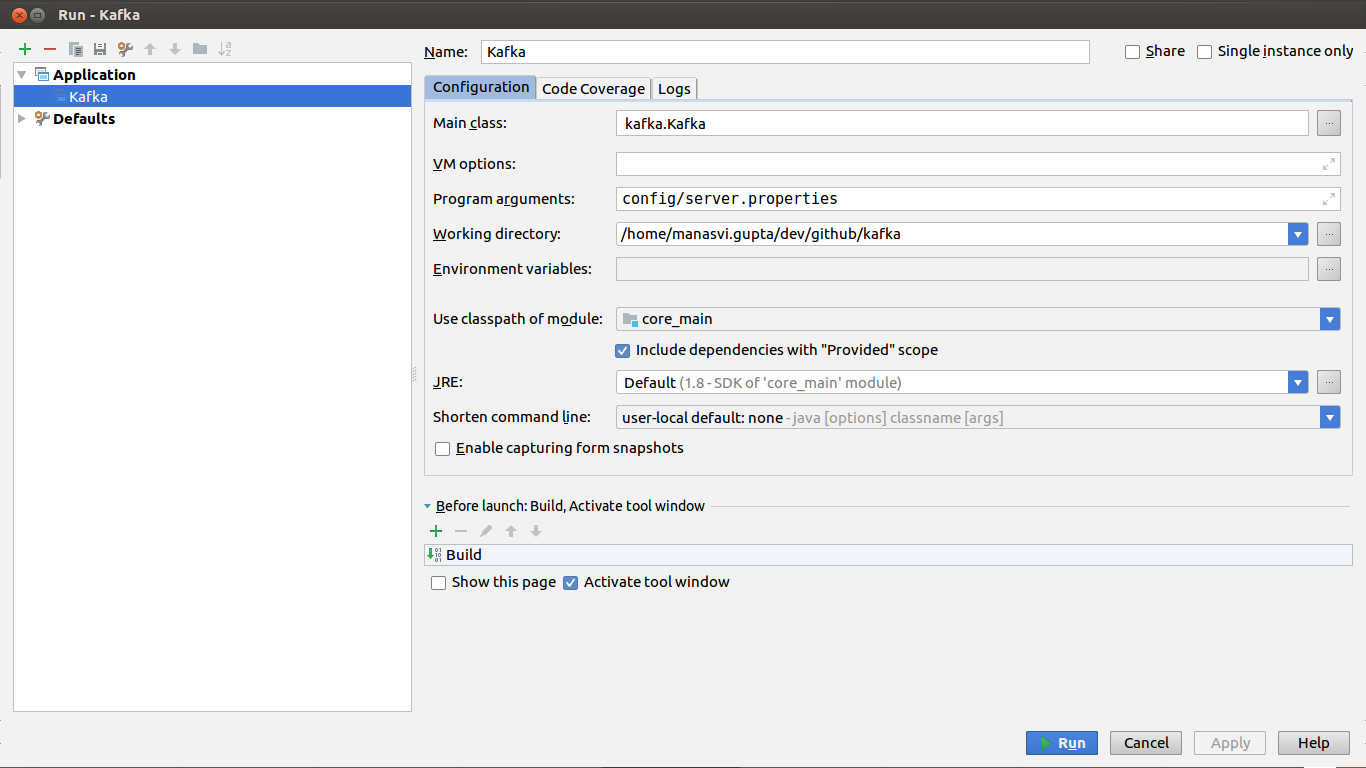
- In Intellij, click on Run > Edit Configurations > + (i.e. Add New Configuration) > Application
- Enter values as per below screen grab & save configuration.

- Next, click on Run > Run “Kafka”
- Intellij console will show log messages indicating that Kafka is running.
- Also, in terminal where Zookeeper is running, you will see logs indicating that Kafka has connected to Zookeeper.
7. Testing Kafka setup
Create a new topic named “test” with a single partition and only one replica:
> bin/kafka-topics.sh --create --zookeeper localhost:2181 --replication-factor 1 --partitions 1 --topic testWe can now see that topic if we run the list topic command:
> bin/kafka-topics.sh --list --zookeeper localhost:2181
test
Run the producer and then type a few messages into the console to send to the server.
> bin/kafka-console-producer.sh --broker-list localhost:9092 --topic test
This is a message
This is another message
Kafka also has a command line consumer that will dump out messages to standard output.
> bin/kafka-console-consumer.sh --bootstrap-server localhost:9092 --topic test --from-beginning
This is a message
This is another message
If you have each of the above commands running in a different terminal then you should now be able to type messages into the producer terminal and see them appear in the consumer terminal.
8. la fin
That’s it. You will now be able to run Kafka from source & debug it at your convenience.
In part 2, we will learn to identify starter (i.e. beginner) bugs in Kafka, fix locally & test. Also, we will look at Kafka code review & change submission process.
